Version-Based Database Migration with Liquibase – Getting Started
Take your skills to the next level!
The Persistence Hub is the place to be for every Java developer. It gives you access to all my premium video courses, monthly Java Persistence News, monthly coding problems, and regular expert sessions.
Creating the database for your application seems to be easy as long as you don’t need to support multiple versions or work in multiple teams. You just generate an SQL script from your database model or in the worst case, export the required statements from your test database. You can then execute it manually or use JPA to do that automatically.
This approach doesn’t work as soon as you need to support multiple versions of your application. And extracting the required changes from the test database becomes a huge mess when the size of your team and the number of changes increases.
You can avoid some of these problems when you create the database update scripts, while working on the next release, and store them alongside your code in git or whichever version control system you use. Whenever someone gets the latest code changes, he will also get the required database changes. With the right tooling in place, you will even be able to apply these changes automatically. One tool that can help you with that is Liquibase.
What is Liquibase
Liquibase is an open source tool released under APL 2.0. It provides you a set of tools to implement an automated, version based database migration for your application.
Some of its benefits are the sequential execution of all required updates to get to the most recent database version, the automatic creation and execution of rollback operations for failed updates and the database-independent definition of the update operations.
In this series of posts, I will show you how to use all of these benefits in your application. Let’s start with the creation of your database before I show you how to update it in the next post.
Define a Database Change Log
The database change log is an XML, JSON, YAML or SQL file which describes all changes that need to be performed to update the database.
In most cases, you want to create 1 file for each release. Each file consists of one or more change sets.
Create a ChangeSet
A changeSet describes a set of changes that Liquibase executes within one transaction. You can add as many changes to a set as you like. But to avoid any problems during a rollback, you shouldn’t define more than one logical change per set.
Each changeSet gets identified by the name of the author and an id. Liquibase stores this information together with the name of the change log file in the databasechangelog table to keep track on the executed change sets.
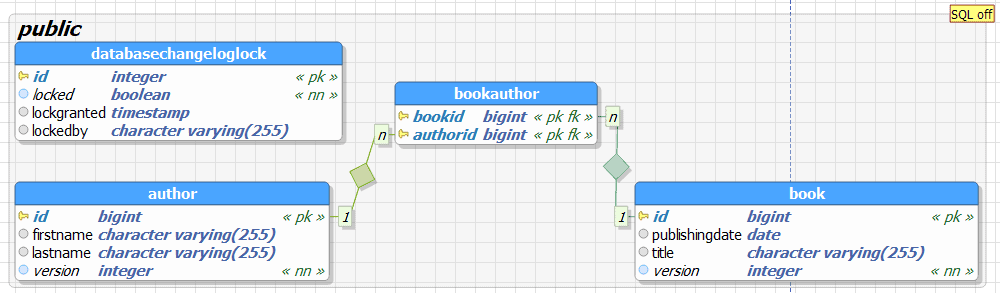
Let’s have a look at 3 changeSets that create a new database table, a primary key, and a foreign key constraint. Liquibase allows you to do a lot more than that. You can change existing tables, define execution requirements, provide rollback commands to handle errors and load data. But for now, let’s focus on the creation of a new database. I will show you the other features in one of the following posts.
Create a Database Table
The following code snippet shows you a changeSet that creates the table author with the columns id, firstname, lastname and version. You just need a createTable element which has to define the name of the table you want to create. On top of that, you can specify other attributes, like the name of the database schema or the tablespace.
You also need to provide at least one column tag as a nested property. In the example, I use 4 of these tags, to define the 4 database columns of the author table.
The attributes name and type are required to define a new column. Liquibase also supports a set of additional attributes which you can use to provide a default value, specify the encoding or set a comment.
You can also use a constraints tag to define a primary key, not null, unique, foreign key or cascade constraint. I use it in this example to create a not null constraint for the id and version columns.
<changeSet author="Thorben" id="2">
	<createTable tableName="author">
		<column name="id" type="BIGINT">
			<constraints nullable="false"/>
		</column>
		<column name="firstname" type="VARCHAR(255)"/>
		<column name="lastname" type="VARCHAR(255)"/>
		<column name="version" type="INT">
			<constraints nullable="false"/>
		</column>
	</createTable>
</changeSet>
As you have seen, the definition of the changeSet is simple and doesn’t require any SQL.
As always, this can be a good and a bad thing. Liquibase will generate the SQL statements for the database you want to use. That allows you to create database-independent update scripts but puts you also at the risk of executing unexpected statements. You should therefore always test the generated SQL statements. I will show you how to export and run the SQL statements at the end of this post.
Define a Primary Key
If you didn’t define the primary key when you created the table, you can add the constraint with an addPrimaryKey tag. I use it in the following code snippet to add the primary key constraint to the id column of the book table. These two attributes are mandatory and you can provide additional ones to provide the name of the constraint, schema, catalog or tablespace.
<changeSet author="Thorben" id="5">
	<addPrimaryKey columnNames="id" constraintName="pk_book" tableName="book"/>
</changeSet>
Define a Foreign Key Constraint
You can add a foreign key constraint with an addForeignKeyConstraint tag. You then need to provide the name of the constraint, the baseColumnNames and baseTableName, that define the column and table to which you want to add the constraint, and the referencedColumnNames and referenceTableName, that define the column and table to which the foreign key points to.
<changeSet author="Thorben" id="8">
	<addForeignKeyConstraint baseColumnNames="authorid" baseTableName="bookauthor" constraintName="fk_bookauthor_author" referencedColumnNames="id" referencedTableName="author"/>
</changeSet>
Generate a ChangeLog
OK, you now understand the basic tags you can use to create the initial database for your application. But don’t worry, you don’t need to write this file yourself if you already have an existing database because you want to add Liquibase to an existing application or you use a tool to model and export your table model.
In these situations, it’s much easier to let Liquibase generate the required statements. You can do that by providing the connection information and the generateChangeLog command to the Liquibase command line client.
The following code snippet shows an example for my local PostgreSQL database. I tell the Liquibase client to use PostgreSQL’s JDBC driver to connect to the recipes schema of my local database, to generate a changeLog that creates an identical database and write it to the db.changelog-1.0.xml file in the myFile directory.
liquibase --driver=org.postgresql.Driver \
      --classpath=myFiles\postgresql-9.4.1212.jre7.jar \
      --changeLogFile=myFiles/db.changelog-1.0.xml \
      --url="jdbc:postgresql://localhost:5432/recipes" \
      --username=postgres \
      --password=postgres \
      generateChangeLog
You can see the generated changeLog below. As you can see, Liquibase used my current username as the author and added ” (generated)” as a postfix and it also generated a prefix for the id.
<?xml version="1.1" encoding="UTF-8" standalone="no"?>
<databaseChangeLog xmlns="http://www.liquibase.org/xml/ns/dbchangelog" xmlns:ext="http://www.liquibase.org/xml/ns/dbchangelog-ext" xmlns:xsi="http://www.w3.org/2001/XMLSchema-instance" xsi:schemaLocation="http://www.liquibase.org/xml/ns/dbchangelog-ext http://www.liquibase.org/xml/ns/dbchangelog/dbchangelog-ext.xsd http://www.liquibase.org/xml/ns/dbchangelog http://www.liquibase.org/xml/ns/dbchangelog/dbchangelog-3.5.xsd">
    <changeSet author="Thorben (generated)" id="1500111714419-1">
        <createSequence sequenceName="hibernate_sequence"/>
    </changeSet>
    <changeSet author="Thorben (generated)" id="1500111714419-2">
        <createTable tableName="author">
            <column name="id" type="BIGINT">
                <constraints nullable="false"/>
            </column>
            <column name="firstname" type="VARCHAR(255)"/>
            <column name="lastname" type="VARCHAR(255)"/>
            <column name="version" type="INT">
                <constraints nullable="false"/>
            </column>
        </createTable>
    </changeSet>
    <changeSet author="Thorben (generated)" id="1500111714419-3">
        <createTable tableName="blogpost">
            <column name="id" type="BIGINT">
                <constraints nullable="false"/>
            </column>
            <column name="publishingdate" type="date"/>
            <column name="title" type="VARCHAR(255)"/>
            <column name="version" type="INT">
                <constraints nullable="false"/>
            </column>
            <column name="url" type="VARCHAR(255)"/>
        </createTable>
    </changeSet>
    <changeSet author="Thorben (generated)" id="1500111714419-4">
        <createTable tableName="book">
            <column name="id" type="BIGINT">
                <constraints nullable="false"/>
            </column>
            <column name="publishingdate" type="date"/>
            <column name="title" type="VARCHAR(255)"/>
            <column name="version" type="INT">
                <constraints nullable="false"/>
            </column>
            <column name="numpages" type="INT">
                <constraints nullable="false"/>
            </column>
        </createTable>
    </changeSet>
    <changeSet author="Thorben (generated)" id="1500111714419-5">
        <createTable tableName="publication">
            <column name="id" type="BIGINT">
                <constraints nullable="false"/>
            </column>
            <column name="publishingdate" type="date"/>
            <column name="title" type="VARCHAR(255)"/>
            <column name="version" type="INT">
                <constraints nullable="false"/>
            </column>
        </createTable>
    </changeSet>
    <changeSet author="Thorben (generated)" id="1500111714419-6">
        <createTable tableName="publicationauthor">
            <column name="publicationid" type="BIGINT">
                <constraints nullable="false"/>
            </column>
            <column name="authorid" type="BIGINT">
                <constraints nullable="false"/>
            </column>
        </createTable>
    </changeSet>
    <changeSet author="Thorben (generated)" id="1500111714419-7">
        <addPrimaryKey columnNames="id" constraintName="author_pkey" tableName="author"/>
    </changeSet>
    <changeSet author="Thorben (generated)" id="1500111714419-8">
        <addPrimaryKey columnNames="id" constraintName="blogpost_pkey" tableName="blogpost"/>
    </changeSet>
    <changeSet author="Thorben (generated)" id="1500111714419-9">
        <addPrimaryKey columnNames="id" constraintName="book_pkey" tableName="book"/>
    </changeSet>
    <changeSet author="Thorben (generated)" id="1500111714419-10">
        <addPrimaryKey columnNames="id" constraintName="publication_pkey" tableName="publication"/>
    </changeSet>
    <changeSet author="Thorben (generated)" id="1500111714419-11">
        <addPrimaryKey columnNames="publicationid, authorid" constraintName="publicationauthor_pkey" tableName="publicationauthor"/>
    </changeSet>
    <changeSet author="Thorben (generated)" id="1500111714419-12">
        <addForeignKeyConstraint baseColumnNames="authorid" baseTableName="publicationauthor" constraintName="fkfoen4eixyipexdqb3spnqd31r" deferrable="false" initiallyDeferred="false" onDelete="NO ACTION" onUpdate="NO ACTION" referencedColumnNames="id" referencedTableName="author"/>
    </changeSet>
</databaseChangeLog>
If you already have a database, generating the changeLog is a lot easier and faster than writing it yourself. But as always, don’t forget to review the generated changeSets so that you can be sure that they meet your expectations.
Export the SQL Statements
Before you execute the changeLog, you should always export and review the generated SQL statements. Some database administrators also need the script for their internal documentation or plainly reject to perform any changes they didn’t review themselves.
In all these situations, you can use Liquibase’s command line client to generate the required SQL statements and write them to a file. The following snippet shows an example in which I tell Liquibase to connect to my local PostgreSQL database, determine the required updates and generate the SQL statements.
liquibase --driver=org.postgresql.Driver \
      --classpath=myFiles\postgresql-9.4.1212.jre7.jar \
	  --changeLogFile=myFiles/db.changelog-1.0.xml \
	  --url="jdbc:postgresql://localhost:5432/test_liquibase" \
	  --username=postgres \
	  --password=postgres \
	  updateSQL
Executing a ChangeLog
After you’ve created and checked the changeLog yourself or used the command line client to create it, you can choose between multiple options to execute it. I use the command line client in the following example but you can also use a maven plugin to create the database as part of your build or deployment process or you can use a Servlet, Spring or CDI Listener to automatically create or update the database at application startup.
liquibase --driver=org.postgresql.Driver \
      --classpath=myFiles\postgresql-9.4.1212.jre7.jar \
	  --changeLogFile=myFiles/db.changelog-1.0.xml \
	  --url="jdbc:postgresql://localhost:5432/test_liquibase" \
	  --username=postgres \
	  --password=postgres \
	  update
Based on the changeLog, Liquibase create the tables and sequence in the test_liquibase schema.
And as you can see in the following screenshot, Liquibase documented the execution of all changeSets in the databasechangelog table. It will uses this information for future runs of the update process to determine which changeSets need to be executed.

Summary
A version based database migration process allows you to evolve your database together with your code and to automatically apply database updates when you deploy a new release. Liquibase is one of the available tools that help you to define and execute the required update steps.
As you’ve seen in this post, you can define database-independent update scripts, called changeLog. These scripts consist of one or more changeSets which describe the required update steps. Each changeSet gets identified by the name of the update file, the name of the author and an id which needs to be unique for each file. Liquibase uses this information to document the execution of each changeSet in a database table and to determine which changeSets need to be execute to update the database.
I only showed you a small part of what you can do with Liquibase and how you can use it to create a new database. In the next part of this series, I will focus on the update and how to define the required database and data migration steps.
A very well-written article, exactly what I was looking for. Thank you!
Thanks
Great explanation Sir, I appreciate that and thank you a lo
Great article 🙂
I have an existing database, I genereated the first changelog file using generateChangeLog command,
Should I write every changeset (XML, SQL) manually for any new future modification on the database? or there is a way to generete the changes automatically?
Thanks!
That depends on the tools you’re using to define your table model. Some of them can export the SQL statement.
If I use liquibase on my application and call UPDATE from inside the application, I’d like to know what should be the structure of a persistence.xml on a application in order to be able to inject the EntityManager object…
That will be part of next weeks post. I will show how you can trigger Liquibase from within your application so that it performs the update before Hibernate validates the database.
I am using Flyway for Version-Based Database Migration, and i think it has better format, and more familiar with user than Liquibase.
Hi Thanh,
Flyway is a very good alternative. I’ve used both with great success and I will write a few post about Flyway in the future.
Regards,
Thorben